Friday, December 28, 2012

Quilting Along with Leah Day - A Year in Review

Sometimes a picture says it all. What follows are images, one from each month of quilting along with Leah and five more images of the quilts I made between assignments. If you click on the first image you should be able to see all 17 as a slide show.

Thank you, Leah for a fabulous year of lessons. You are the best!

January - Stippling varying scales in channels

February - Using varying scales of stippling to help a design element stand out

March - Starting a small whole cloth quilt

April - Sharp stippling

May - Zippling incorporates sharp angles and straight lines

June - the basics of Circuit Board

July - using starch and freezer paper templates to turn over the edges of labels

August - auditioning quilting patterns with pencil first

September - Lava Paisley, one of several pivoting designs

October - Flowing lines with pockets of pivoting paisley

November - Large, larger and largest scale of flower

December - Overlapping hearts that weren't overlapped. :)

Hibiscus Haven - my original design

Marvels of the Deep - a tweaked pattern made for my granddaughter

Tree Serenade - Note every section except the tree was cut from a practice piece
made executing a Leah Day assignment. It was assembled using the Quilt As You Go
method that was taught by Leah.

Seagulls on Parade - a tweaked pattern made for my first grand niece.

Beach Stroll - my original design.

Sunday, December 23, 2012

Quilting Along with Leah Day - Week 45

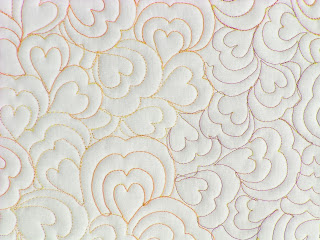
Front Side of Week 44 & 45 Practice Piece
December 21, 2012 has come and gone and the world did not to come to end. Not that I was worried. However, I have been struggling with the idea that Week 45 of Quilt Along with Leah Day would be the last assignment. I have truly enjoyed the process of tackling each new assignment. What would I do next to keep the momentum going? It seems that Leah has a whole new series of assignments she has been working on for 2013. Guess what I will be doing?

Back Side of Week 44 & 45 Practice Piece
When I am not blogging about my experience of creating under Leah's tutelage, I plan to share my personal work as well as Tricks and Tips of the Trade. Here is my first tip - there is no right way to do what needs doing in quilting. What is important is to try various ways and understanding what they are and are not good for. Which way to press a seam is a perfect example. When I started quilting, back in the Jurassic era, the hard and fast rule was to press the seam towards the darker fabric. Why? There were three reasons. One, the dark fabric, if pressed towards the light fabric might shadow through. Two, batting tended beard and therefore by covering the seam by pressing fabric over it, batting threads wouldn't sneak out through the seam to the front of the quilt. Three, most quilts were hand quilted. The quilting motif could be designed so that it never had to go through more than three layers (top, batting and backing) versus four layers (top, seam allowance, batting and backing.) My preference today is to press my seams open. Why? The seam allowance doesn't shadow through. The quilt is flatter. I choose a batting that doesn't beard. Finally, I no longer hand quilt. My machine can handle going over seam allowances.

Detail showing a tweaked "Heart Confetti"
quilting pattern. 
What that tip is really saying is that you are in charge of your design and your technique. There is so much praise I could heap on Leah, but I will share one thing here that I appreciate about her. Leah encourages experimentation. She does not insist that things be done her way. Of course her way has come from experimenting and learning what works best for her. In this week's assignment, "Heart Confetti" I diverged from Leah, once again. What I liked about the design was the hearts, the echoing and the pivoting. I'm still not sold on overlapping designs. I did overlap a few hearts in the beginning, but quickly swapped out the overlaps for tripling and even quadrupling my echoes instead. I actually find it less confusing to pivot and echo a design than to overlap. Of course my goal wasn't to cover a big area quickly with an overall pattern. I just want to quilt hearts in the star section of my quilt.

A back side detail of my version of "Heart Confetti."

Once I completed "Heart Confetti", or perhaps I should rename it "Throbbing Hearts", I tried out my own pattern, "Starry Night" in the border. It is done by creating a short curvy line, then a five pointed star, followed by another short curvy line which precedes to spiral first in and then back out again (much easier than travel stitching) then repeat.

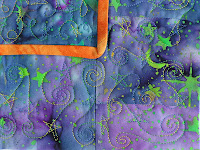
"Starry Night" seen from the front.
"Starry Night" as it appears on the back.
I am so grateful that our journey with Leah is not coming to a halt, but will continue on into 2013. I hope you will join me in a year filled with the joy of creating.


Sunday, December 16, 2012

Quilting Along with Leah Day - Week 44

Starry Night - Front
24" H x 24" W
Have you ever started a quick and easy project, then decided to change one or two things only to find yourself hours later enmeshed in a project that is neither quick nor easy? That is precisely what happened to me when I took on the assignment of doing a "Starry Mess" practice piece.

"Starry Mess" is the latest in Leah Day's free motion quilting patterns of overlapping designs. The idea behind the designs are that they are easy to do and quickly secure the quilt top, batting and backing together. They are best used on comfort versus show quilts or art quilts.

What I realized when looking at "Starry Mess" was that this design just didn't call out to me. I liked the stars, but not the mess. I knew I had to tweak it in order to keep myself engaged in the lesson. I began by asking myself where I would like to see stars quilted. I visualized them in the sky background of traditional star blocks.

Tweak number one was to piece an oversized star block I could practice on. It took more time than just selecting a night sky fabric from my stash, but not that much more time. Tweak number two was to add a border to the block. Also, simple, but more time. The problem started when I debated about which fabric to use for the border. The one that made the most sense was the night sky. This lead to tweak number three. How did I distinguish the border from the block? I would add a folded strip in the seams  between the block and the borders. That tweak was a major learning experience.

Detail from Starry Night

The final tweak was modifying the free motion quilting pattern so that each star stood out, but so that it was still one continuous line of quilting. I achieved this by adding a line with a loop in the middle or alternating stringing stars with loops. A modification I am considering for the border is to alternate stars with spirals along a string. I think it could be quite effective.

Detail from the Back Side of Starry Night

Working on a project like "Starry Mess" to a point where it morphs into my interpretation of Van Gogh's "Starry Night" is precisely why quilting calls to me. I may think I want quick and easy. What I thrive on is discovery and seeing a project take on a life of its own.


Monday, December 10, 2012

Quilting Along With Leah Day - Week 43

Front Side of "Scribble"

This week's free motion quilting design was named Cat Hair Ball or Scribble. The way it turned out when I let it flow naturally was reminiscent of a pretzel, just without the cross. This is definitely a quick, easy and soothing pattern. Leah recommends it for sashings. I tried it as an all over design. My recommendation would to be to use it for a young child's blanky.


In Leah's instructions for executing Scribble she mentions that the "bird's nest" or what I think of as eyelashes that can be seen on occasion with this pattern, on the back of the quilt is NOT a tension issue but an issue of how it is easy to be change the speed of your hands as you swoop around a curve, thereby getting out of synch with the speed of the needle, controlled by your foot on the peddle. Although I rarely get an out and out bird's nest on the back of my quilt any more, I do have a tendency to get eyelashes. So, I challenged myself to reduce them when practicing Scribble. They are there, but in general the eyelashes are less frequent and most are mere stubbles.

Backside of "Scribble"
Note I wrapped it with echo quilting

Another goal I gave myself with this assignment was to keep the quilt fairly open or at a midscale, versus my tendency to go for small scale and even micro scale quilting. This keeps the quilt more supple. However, I find it trickier to avoid the eyelashes and maintain an even scale in mid to large scale quilting versus small scale quilting.

Detail of the backside of "Scribble"
In some areas the eyelashes are obvious. In other areas
you have to look closely to see hints of them.


Backside of the "Pod" practice piece.
An excellent way to compare the designs
from the last three assignments.


Wednesday, December 5, 2012

Quilting Along with Leah Day - Week 42

Front Side of Tangled Lights


I really should go back and check Leah's video before I launch into doing my assignment.  I tend to remember the gist but not the details. On the plus side I often end up with a cousin of Leah's designs, giving me double the patterns to play with in the future.

Back Side of Tangled Lights

The plan this week was to rapidly quilt sashing by "stringing" spirals one after the other. I can't recall the last time I pieced a top that included sashing. This put me in a dilemma. Should I piece a new practice top with sashing or tweak the design to be a filler pattern. My time was very limited this week since I was on the road. I opted to tweak the pattern and title the new design Tangled Lights. 


Detail of Tangled Lights

In order to execute the filler pattern I started with a wobbly spiral baseline, working from the outside towards the center of the space I wished to fill. Once I reached the center I added the spiral ornaments/lights, working my way out along the wobbly baseline. I left gaps between the ornaments because that is what I thought the design called for. Oops! However, those gaps allowed me to stagger the ornaments, which left room for the next concentric row of an ornaments out. Finally, since I added Tangled Lights to my Wrapped Gifts practice piece, I wrapped my ornaments with some echo quilting.

Sunday, November 25, 2012

Quilting Along with Leah Day - Week 41

Front Side of Wrapped Gifts aka
Invasion of the Pods.
The yet to be quilted section is on reserve
for a future assignment.
"Invasion of the Pods" is the catchy title that Leah Day gave to this week's assignment. The mission, should I choose to accept it, is to quickly knock off  the quilting necessary to turn a WIP or UFO into a gift for some lucky person this holiday a season. I might have chosen "Gift Wrapped with Love" as the title. In fact that is just what this free form pattern has you do. First you create the "gift" and then you wrap it with love by surrounding the gift pattern with echo quilting. You can give the same gift multiple times on a quilt or custom select a different gift for each section.


Detail of Snake Paisley including the gift wrapping echo.
My first step was to create a practice quilt. I wanted something large enough to practice on and I like to have a few seams, just for the challenge of crossing over them. I also like to select multiple fabrics, since most quilts are not have the same hue and with a varied value. I went to my stash and chose five compatible fabrics from my violet/fuchsia stack. I cut each of the five into 12.5" wide sections by the height of the fabric. Sometimes this was 14" and at other times it was closer to 20". I alternated the violets with the fuchsias, seaming them along the 12.5" side until I had a length of fabric approximately 90" long. I cut this in thirds and this time seamed the resulting three segments along the 30" length. Viola! Instant quilt.  I think this method would be a great way to use fat quarter packets. One of the advantages of various lengths of fabric is that the "blocks" are randomly staggered.
Detail of Flowing Leaves

Now it was time to select the "gifts" or free motion quilting pattern that would be at the center of each segment. I turned where I often do for inspiration, to Leah Day's 365 Quilting Patterns and looked through her pivoting patterns. I thought I should wrap four gifts in order to both practice the wrapping and how to move from one quadrant or section of the quilt to next. I choose Snake PaisleyFlowing Leaves (one of my all time favorites that I have used in numerous quilts) Pebbled Paisley and Dandelion Puff.The first gift I created was Snake Paisley. I had no problem with free motion quilting the design. Nor did I have an issue with echoing the outer perimeter of the clump of paisleys. However, I did struggle with what to do about echoing the sections near the outer corner and along the edge of the quilt, because echoes assume an even border, but this was substantially wider. I "faked" it. If I were to use this method on an actual quilt, I would either want to make sure my paisleys did a better job filling a segment evenly or work out a better method of echoing large, open sections.


This is where the four gifts come together.

An even closer view of the juncture of the four gifts.


The rest of the gifts/segments basically went without a hitch. So, perhaps I learned sufficiently from the first segment to adapt the final three. As for using this method of quilting to rapidly quilt a UFO or WIP, I think not. Other than stippling, which I could have chosen, any free motion quilting pattern takes time and so does echoing to do well. However, if you have time, this could be a lot of fun, especially if you theme the various gifts to go along with the quilt's theme - say leaves and flowers for a garden path quilt.

Backside of Wrapped Gifts

Sunday, November 18, 2012

Following Leah Day - Week 40

Leah Day's current assignment is another in her series of large scale designs that quickly secure a quilt's layers and is recommended for utilitarian quilts. The basic premise is a flower with multiple petals branching off a central spiral. Let's just say that I took great liberties with this design.

Front Side of Floral Garden
24" x 24"
First, I prefer to start my spirals from the outermost point, spiral my way into the center, than do a u-turn, spiral my back out and connect the circle. Like many things in quilting every teacher and student has their favorite way of doing things and reasons for their preferences. It doesn't make one way better or worse, just different.

Detail of Floral Garden
Showcases how I create my spirals
Leah overlapped her petals and had rounded outer points. The design just wasn't calling to me. I prefer petals with pointed ends and the overlapping looked like bad travel stitching. I played with the design on paper and created a 16 petal design that filled the space and was more pleasing to my eye.

I could have practiced the design on a whole cloth quilt sandwich, but I thought it would be more fun to whip up a simple garden quilt that would allow me to practice the design in several scales, multiple times. So, that is just what I did. The quilt is 24" square. The three floral block sizes are 12, 8 and 4 inches. I tossed in some vegetation/path sections just for fun and filled them with leaves. If this were to be a more formal piece, versus a practice piece, I would have nestled the leaves right up to the floral design, much the way stippling can surround a design to provide change in texture.


Backside of Floral Garden
Note how the tightly compacted leaves contrast
with the looser larger scale flowers, allowing the
flowers to steal the scene.

 I did opt (no surprise here) to mark each floral square with water soluble crosses on the diagonal and horizontal over vertical lines. This gave me a guide to orient the petals. I also tried Sharon Schamburg's method of hand basting the sandwich. It definitely took more time than pin basting, BUT the quilt was much easier to maneuver without pins. It folds and bunches more easily and your hands grip only the quilt, versus awkwardly resting on pins. I highly recommend giving it a try.

Sunday, November 11, 2012

Quilting Along with Leah Day - Week 39

"Matrix" - Front Side
Executed on an 18" x 18" Block
No more flowing lines - sort of. Leah has us moving on to handy quilting patterns  that quickly secure quilts that are meant to be used. I honestly can't recall the last time I quilted with this as my focus. Even when I quilt charity quilts I can't resist having fun and therefore opting to quilt some pattern that relates to the theme or fabric. However, just because Leah labels "Matrix" a utilitarian, fast overall pattern doesn't mean that is all that  it is good for. I can imagine Matrix done in white pearl cotton to create fishing nets, or a lighter weight thread for a butterfly net or my favorite thought a snood with beading at the junctures.

"Matrix" was the perfect design to follow flowing lines. It is formed by creating an undulating line from corner to corner of the area being filled. The first line is the guide for creating parallel lines across the rest of the area. Once that is completed a second undulating line perpendicular to the first line, starting and ending at the two other corners, is stitched. This line is the guide for lines perpendicular to the first set.  What is formed is a free flowing grid.


Detail of "Matrix" Practice Piece
Note how I used the piecing junctures as a guide to keep
my diagonal line on track.


Even following Leah's advice to readjust my hand position every 4" or so, I find I struggle not to jerk off line from time to time. I suspect this is not exclusively a free motion quilting learning issue. I have noticed similar issues with my handwriting as I age. No matter how assiduously I concentrate, flowing smooth lines are impossible for me to achieve when writing.

Actual photo of "Matrix" practice piece not enhanced by cropping.
Not the travel stitching along the outer perimeter of the block,
thus avoiding any need to cut and bury threads.

I made the conscientious decision NOT to follow along with Leah when it came to cutting the thread at the end of each line of stitching. My rationale was multiple fold and one that works best for me. First, my block was 18" x 18" and not a full sized quilt. This was one reason why my work wasn't constricted by the throat (the space to the right of the needle, between the needle and the machine.) Second, I opted to quilt this on my George that has a 20" throat versus my Bernina that only has an 8" throat.  I have near zero tolerance for cutting and therefore having to bury thread even with the aid of a cheater needle. Instead I ran off the edge of the quilt at the end of each line of stitching and sewed to where I needed to be next alone the outer perimeter where the travel stitching would be hidden by binding. Much easier and faster!

Back of "Matrix"

Detail of "Matrix's" Back

Once again, I am left with a feeling of close enough. I should be able to "fake" this pattern as needed.

Saturday, November 3, 2012

Quilting Along with Leah Day - Week 38

Lost Data - Front
Leah Day's assignment this week gave me another much needed pass at Jagged Lines. My struggles with last week's Jagged Lines assignment helped me zero in on my area of confusion (how to start and end the gaps.) When I watched Leah's video for Lost Data (Jagged Lines filled with Zippling) I paid particular attention to this trouble spot, pausing and rewinding the video multiple times until it sunk in. Then I practiced a few rounds with pen and paper.

Got it! One more free motion quilting pattern to add to my repertoire.

Detail from
Lost Data


Lost Data - Back

Detail from Lost Data - Back
The learning curve on Lost Data was typical of so many of life's challenges for me. It isn't that I am completely befuddled. Instead, I am missing one key component. The problem is discovering what that is and mastering it. Once it is learned the question becomes why was it so difficult in the first place? I choose not to dwell on that. Instead, I accept there will be many more moments of confusion in my life. I take heart in the knowledge that eventually I figure it out, all the more satisfied for having done so.