Saturday, August 25, 2012

Quilting Along with Leah Day - Week 28

Detail from Seagulls on Parade
Seagulls on Parade
Based on a Pattern by Linda Worland
Created by Gwyned Trefethen


Why do I seem destined to forget that less is more? Linda Worland designed a relatively simple paper pieced pattern of 5 seagulls on sand with the ocean in the background. It worked out to 4" H x 18 W" as designed. There was no border. I doubled the size of the blocks, multiplied the number of rows by 5, added a 3 strip border and modified the design to cope with a shortage of the water fabric.

Parallel Lines
I could have done an all over stipple as the quilting design and it would have been just fine. However, that just isn't my style. Instead I invented an echo series of feathers for the seagulls in a pearlescent white, quilted Leah Day's Goldilock's design in the sand with yellow/beige variegated thread and used another Leah Day design for the blue green background. This in a blue, green and purple variegated thread. Thank goodness for all the practice I have been doing travel stitching and learning how to navigate my way around motifs or in odd shaped sections. It really came in handy.

Now I was faced with how to quilt the borders? When I was designing the border I tried out a solid black border as well as a beach themed fabric border. Neither worked. The three strip border worked best for the quilt. However, now that it is time to quilt it the high contrast of value and solid versus pattern was giving me conniptions. Leah must have sensed my dilemma because her very next assignment addressed my question.

Cartoon Tree
The assignment for Week 28 was to audition several quilting pattern layouts for a quilt top. In the past I have researched what pattern to use. I have tested my preferred pattern on a practice piece. I have never actually sat down to draft multiple patterns and options to get a sense of how they would look beside each other. 

I drew out the piecing diagram of the lower left corner of the border and included a small section of the lower left block. I knew I wanted to use the same quilting pattern in the beach fabric that I had already used - Goldilocks. I also drew in the pattern I used for the blue and green background fabric. The only pattern I was uncertain of was what to choose for the black fabric.

First, I tried the simplest pattern I could think of - parallel lines. My hunch was to set them 1/4" apart. This would certainly make life easy. However, my attempts at stitching in this way often results in the channels looking pushed in opposing directions. 

Second, I wanted to see what would happen if the pattern more closely resembled the other pattern in the border and had a similar density. Cartoon Tree fit the bill. It also allowed the beach pattern to run horizontally and the quilting pattern in the black to run vertically. However, it just looks too jumbled to me.

Scallop Shells with Micro Stippling

Is less really more? My third and final option was to quilt scallop shell motifs into the black strips and surround them with micro stippling. What was I thinking? This is definitely the most technically difficult option. Thanks to working with Leah for 28 weeks I have the skill set to do it. I also know it will take me several weeks of work. It sure is tempting though.


Monday, August 20, 2012

Quilt Along With Leah Day - Week 27

Leah ran into a technical glitch this week which meant that she was unable to film and blog about her latest assignment for her followers. Instead she shared the method she uses to store her show quilts. It is very similar to the method I use to ship my quilts. The basic premise is to roll the quilt around a pool noodle. My tip is that if you are new to using pool noodles, but plan to add them to your supplies for storage and shipping, buy them during the summer. These are seasonal items. The price can triple over the winter, that is if and it is a big IF you are lucky enough to find them somewhere.

Here are few items all quilters accumulate that require organization to have them easily accessible and how I have chosen to deal with them.

Ruler Peg Board

There is nothing like a peg board purchased from a hardware store for organizing tools and rulers. Each ruler can be hang from its on "L" shaped hook. When the ruler supply grows multiple rulers of similar shapes can be hung from a single hook with the largest ruler in the back. I hang my rotary cutter and shears here when they are not in use.

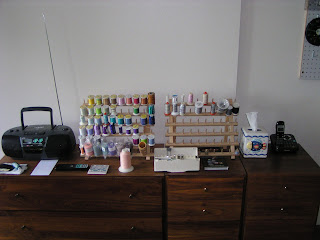
My Most Frequently Used Thread Collection
Note that the caption reads my mostly frequently used thread collection. I have a second supply of threads that are predominately manufactured by Sulky and are their smallest spools. I store them in a plastic box that opens either from the front or back and has many compartments. This was I tip I picked up years ago. The box's purpose is to store matchbox cars. It works great for Sulky spools since you can load three full spools to a compartment. It is not the best system for moderate or large spools. For these I use June Tailor thread racks. Mine sit on a chest of drawers. However these racks can also be hung on the wall if you are short of horizontal space.

A Closer Look At My Active Thread Supply
I gritted my teeth and had my husband take the photographs for this blog without me being present. I didn't want to be tempted to clean up my work space. So, what you are seeing is what the studio looks like on any given day. My Bernina sits to the left and catty corner to the thread supply, facing out the window. I have a desk chair on casters as my sewing chair. Any thing on the chest of drawers is accessible just by pushing back and turning. There is a coaster for my drink, feet for the Bernina, tissues, a telephone and although I rarely use it now, my radio complete with tape and CD player.

Note how my threads are divided by type with a collection of Superior's King Tut series running across the top two rows on the left with a few interlopers. Then there is a small but serviceable collection of Bottomline thread, also by Superior. I like to sort my collections of thread by hue (color) and then value. Most of the neutral threads on the far right are the ones I use for piecing.

The Stash
I had simple shelves built into a small closet in my studio. Normally the door is closed so that my fabric stays unexposed to light. I like to arrange my fabric, just like my threads, by type and then by hue and value. The top two shelves are commercial prints in primary and secondary hues. The next shelf down contains neutrals and a few prints where black is a significant player. That blue bin has scraps of fabric left over from fusible projects as well as non cottons that have come my way. The lowest shelf contains a collection of solids I picked up very, very early in my career when Jo-Ann's had a sale. I bought half a yard of every one of their colors. Thanks to Leah, I have put this collection to good use. It features in a many a practice piece. I did invest in a bolt of muslin, that I washed and rolled back up to use as backings on future Leah assignments. Inside the clear bin and to the left of it are fabrics I have hand painted, dyed or marbled. Yes, this really is nearly my complete fabric stash. I have just two more stacks of similar height to the stacks in the closet, of black and white fabric that I store separately. This is the collection I turn to and replenish whenever I make a piece in my Shifting Value series.

Entwined is an original Gwyned Trefethen design
64" H x 48" W


Wednesday, August 15, 2012

Quilting Along With Leah Day - Week 26

Remember Tree Roots from Week 24? Well it has undergone a metamorphosis.

Tree Roots Transformed

Rather than Quilting Along with Leah this week we are Painting Along with Leah. I have been painting, dying, stamping and inking fabric for over fifteen years. It is something I try, but am never seduced into focusing on for more than a day or two at a time. A friend once said if she were meant to sew her own clothes than why were there so many department stores? I feel the same way about taking the time to develop and use my surface design skills. Why bother when there are so many wonderful commercial fabrics out there? Of course the answer is for the precise reason Leah opted to paint a portion of her current goddess quilt - to enhance and improve the work in a way that stitching and piecing can not.

Close Up of Tree Roots after Painting

I am a sucker for shimmer, so Leah's recommendation of using Jacquard Lumiere paints called to me. No surprise, despite my extensive collection of stencil paints, Seta Color paints, Shiva Paint Stix, fabric pens and dyes I didn't own any Jacquard Lumiere paints. I ordered and received a starter kit of paints. This way I would have 8 colors to play with.

What I quickly discovered is that the color in bottle is not what the color looks like on the fabric. I only had one green to choose from. I played with adding yellow to it. I tried adding blue. Nothing got the color I was looking for. If this had been a formal piece versus a practice piece I would have started with gold and added a hint of green in order to achieve a higher contrast with the background fabric. The paints did glide on quite nicely and stayed put versus bleeding into the fabric.

Fabric is White Muslin That Has Been Hand Painted
With Heliographic Paints and then Enhanced
With Free Form Leaves Painted with Jacquard Lumiere Paints


I had extra paint left after completing the Tree Roots project. I added some black Neopaque paint to the green Lumiere paint. I was hoping for a deep leaf green but got a dark olive bronze shade instead. Rather than use a stencil as I did with Tree Roots, I simply free hand painted a series of falling leaves onto a fabric I had hand painted with heliographic paints years ago.

Close Up of Free Form Leaves

The hand of the fabric where the Jacquard paint has been applied is pretty stiff. It is not so stiff that the fabric can't be folded or rolled. I do wonder if I would be able to stitch through it. That will be the next test.

Quilting Along with Leah Day - Week 25

I have a secret project that I hope to share with you a few months hence that is guiding my recent fabric selections. I needed some dappled green. Since the best thread in my studio was a deeper hue than most of the greens in the fabric it is relatively easy to see the stitching, even in the front view.


Front View of Cucumber Vine Practice Piece

This assignment was a tough one. It involved travel stitching greater distances and along curved lines. Leah named the pattern she has us practicing, Cucumber Vines. Instead of expanding with branches or roots, spiral tendril shoots reach out through the open space.

Detail of the Spiral Shoots Shows Just How Trick
Travel Stitching Can Be
Because travel stitching along a spiral is so I tricky, my personal preference when quilting spirals is to never travel stitch, but to instead leave a very wide channel when I spiral in and then spiral out by bisecting the channel.

Back Side of Cucumber Vine Practice Piece

It never hurts to practice. I have no doubt that my traveling stitching is improving, even on the curves, since the gap between the first stitch line and the travel line, when it does occur is tighter than in the past.

Detail of Back Side of Cucumber Vine Practice Piece

It is easy to get hung up on the travel stitch gaffs. Looked at from a glass half full perspective, I have made leaps forward with tension issues due to lack of hand/foot coordination or hesitation beads. There are no pulled loops around the curves. There isn't a single hesitation pile up of thread. Perhaps there will come a time in the future when working on the latest challenge that I discover my travel stitching no longer has gaps.

Monday, August 13, 2012

Quilting Along with Leah Day - Week 24

I am curator of a traveling exhibition for Fiber Artists Coalition, titled Conversations in Stitch. When I was recently interviewed about the exhibit for a newspaper article the journalist asked about the title and what I was trying to convey with the work I had selected. Here is what I told her. The work may appear as quite an eclectic collection at first. However, shapes, colors and subject matter repeat throughout the exhibition but are interpreted differently by different artists. I suggested to the journalist that she look at the many ways that trees are rendered in the artwork.

Full View of Tree Roots Practice Piece

Leah's latest assignment has us practicing a free motion quilting with a pattern called Tree Roots. How apropos. We have moved from beginner stitching to advanced beginner level. Tree Roots requires not only plotting our route but back tracking, or travel stitching.

Close Up of Tree Roots
Note Some Travel Stitching is Not detectible
While Other Travel Stitching is Obvious 

You may recall that the prior assignment was titled Branching Out. Tree Roots and Branching Out are basically the same, but the roots are slightly curved while the branches are all straight lines set at angles to each other. I found it more challenging to travel stitch along a gently curved line than a straight line.

It is easier to see the overall pattern that Tree Roots creates by viewing the back side of the practice piece. I purposefully select a commercial fabric with various hues and values as my front. Since that is the type of fabric I use for most of my quilts. However, to demonstrate my stitching acume (or not) I use solid fabrics on the backside.

Back Side of Tree Roots Practice Piece

There is nothing like a closeup to on solid fabric to show every single stitch...

Detail of the Back Side of Tree Roots
If you want to get an even closer look you can click on any picture and it will be enlarged.